
Contents | Start | End | Previous: Chapter 22: Formatting For Print | Next: Chapter 24: Advanced Topics
This chapter describes how you can use Jutoh’s facilities for creating different ebook output depending on format, distributor or other criteria, without needing to maintain different versions of your project.
It’s common to want to create different versions of your book for different distributors, formats or purposes. You may need different book identifiers, or different text describing where to buy the book, or perhaps you’d like to create a small sample for your web site that can be easily recreated when you update the book. Or you may need to add extra pages, blank or otherwise, for a print book. Or perhaps you need to include different audio or video media for different formats.
With Jutoh, you can do all this without needing to split your project into different copies, which can become a time-consuming, confusing mess. There are several ways of creating conditional content, suitable for different tasks or kinds of content, but they all depend on the fact that you can have multiple configurations, even for the same format. You might have a ‘Epub Sample’ configuration that creates an ebook containing the first couple of chapters of your book. So to create your sample, you just select ‘Epub Sample’ and press Compile. The different values of options in your configurations will determine how the book is created.
These are the different methods available to you for changing the book without editing content each time:
Tagging section and media documents;
Tagging chunks of content;
Specifying string variables in your content;
Specifying paragraph styles to include or omit.
Let’s look at each of these.
To include or exclude whole section documents, you can specify tags (arbitrary names) in each document, and then tell your configurations whether to include or exclude documents matching these tags.
Let’s say you wanted to be able to create a sample book in Epub format. Create a new configuration called ‘Epub Sample’ using the ‘+’ button on the Configurations panel in Project Properties. To get there, press Edit next to the configuration drop-down in the Jutoh Control Panel (bottom left of the Jutoh window). Type ‘Epub Sample’ for the new configuration name, and select a configuration to base this one on, or just press OK to be prompted for a format which will be used to create appropriate configuration defaults.

Creating a new configuration
Once the configuration has been created, search for Exclude sections matching tags in the search field at the bottom of the dialog. Type ‘notsample’ as the value for this option, to indicate that chapters that are not part of the sample should be excluded from this version of the book. Press OK to close the Project Properties dialog.
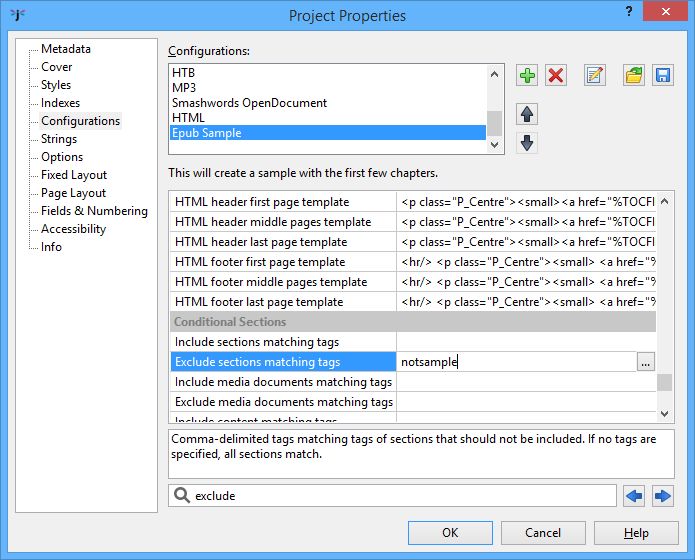
Specifying sections to exclude in the new configuration
Next, for each section document you want to omit from the sample, open the document properties dialog using right click or control click over the project outline, or using the menu command Document | Document Properties (Shift+Alt+Enter). Type ‘notsample’ into the Tags field.
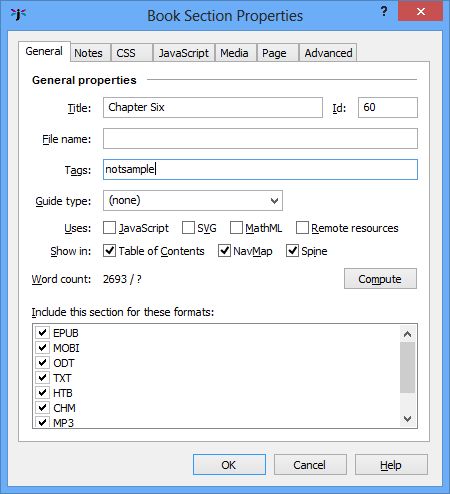
Entering a tag into the book section properties
Now when you compile the ‘Epub Sample’ configuration, only the desired sections (those not matching ‘notsample’) will be included. The other configurations will still compile the whole book because if the Include/Exclude sections matching tags options are left blank, all sections are included.
Your table of contents will still work in the sample despite the absence of some documents, because Jutoh won’t complain about broken links to documents that are deliberately excluded, and will simply omit the page links – so the reader will be able to see the list of chapters in the full book. Actually, this is not quite true – by default, Jutoh will warn about the missing links, but you can switch the warnings off by checking the configuration option Permit links to absent content (a.k.a “I know what I’m doing, please shut up about it” mode).
You can add multiple media documents with the same or different file names and specify different tags for them, which are mentioned in Include media documents matching tags and/or Exclude media documents matching tags. The appropriate media files will be written to the book. If the files have different names, you will also need to create multiple versions of the media object that references the media, using the ‘condition’ object (see below).
Tag names in the above configuration options can contain wildcards (‘?’ and ‘*’) to match against multiple tags, and you can specify the tag ‘#’ (the hash character) to match against a document with no tags. Use ‘*’ (asterisk) on its own to match all documents, except those specifically included or excluded.
To include or exclude parts of a document, you can use the ‘condition’ object. Select the relevant text, then in the Objects tab in the Formatting Palette, double-click on ‘condition’. Type a tag name into the Tags field. If you want, you can add notes so you can remember why you’re making this text conditional. Your text will now be bracketed by the opening and closing markers of the ‘condition’ object. This is shown in the screenshot below; by hovering over the opening condition object, you will see the tag(s) defined for this condition; or you can click on the object to edit the tags.
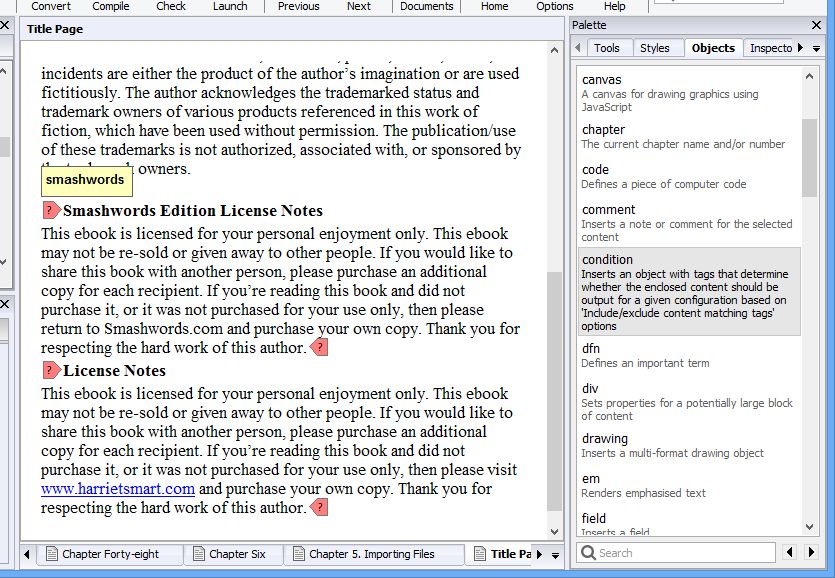
Condition tags marking up two blocks of content
Now you can mention the tag in Include content matching tags and/or Exclude content matching tags in your configurations. For example, if you only want some text to appear in your Smashwords book, use the tag ‘smashwords’ and add it to Include content matching tags in your Smashwords configuration.
Sometimes you might wish to exclude all conditional content except for particular tags, rather than specifying all the tags that are not relevant for the configuration. This avoids you having to go back and add tags to exclude for lots of configurations, after you’ve added more tags in the project. To do this, use the value ‘*’ (asterisk) for Exclude content matching tags, and specify the tags you wish to include (if any) in Include content matching tags. Similarly, you can use an asterisk in Include content matching tags to indicate that all tags should match, except for the exclusions.
Tag names can contain wildcards (‘?’ and ‘*’) to match against multiple tags, and you can specify the tag ‘#’ (the hash character) to match against a block with no tags.
You can mark up as much content as you like within a section document: from a single letter to multiple paragraphs. You can also move the markers around with cut and paste, or delete them both to remove the condition. You can nest conditions within each other, but don’t overlap different spans of conditional text.
You can specify variables in your content to be filled in when the configuration is compiled. For example, you could have two versions of your book where a character has a different name in each. Just use, say, %HERO% within the content, and have different configurations that reference different string tables where the value of HERO is either Joe Bloggs or Bob Smith.
What are string tables? Each project can have zero or many string tables, consisting of name/value pairs. So you could create two string tables in the ‘String tables’ panel of your Project Properties dialog, one called HeroJoe and one called HeroBob. HeroJoe has a string called HERO with a value of Joe Bloggs, and HeroBob has a string called HERO with a value of Bob Smith.
There are two more things you need to do to make this work. In each of your configurations, you need to reference the correct string table. So in your configuration ‘Hero Joe Epub’ you can set the option Project string table to HeroJoe, and in your configuration ‘Hero Bob Epub’ you can set the option Project string table to HeroBob. Also, check Replace strings in content in both configurations or Jutoh will not bother looking for variables to replace.
You can use this mechanism to have different ISBN numbers in different configurations. If you have a variable %ISBN% in your project metadata, it will take its value from the relevant string table when you compile the project. Alternatively, you can also use the Identifier configuration option to do the same thing, and leave the Identifier metadata field blank, but the disadvantage of that approach is that you can’t mention the ISBN in your document content (for example, your title page) since there is no variable to use.
There’s another way of inserting string table values into your project – you can insert a get variable field, and specify a source (such as project-table to use whatever the configuration specifies) and variable name. For more on this, please see the Working with fields topic in the Jutoh application help, or type “get variable” into Search Help in the toolbar.
The idea here is to specify in each configuration which paragraph styles should be used to omit or keep text styled with them. This method predates the ‘condition’ method and is not recommended for new projects as it makes it difficult to specify arbitrary styles for your conditional text. Plus it’s not obvious at a glance which text is conditional, and can’t be used for arbitrary conditional text within a paragraph. You can read more about it in the topic Using styles to change ebook content in Chapter 12.
You can have as many configurations as you like, even with the same format specified. However, you will probably want to change the Book file name configuration option to ensure that your ebook file names are unique and don’t overwrite each other. So you might set the values %FILENAME%_GooglePlay, %FILENAME%_Lulu, and so on. %FILENAME% will be replaced with the project filename and the correct extension will be appended.
This chapter has shown you how to make your ebook content adapt to the criteria specified in your configurations. The next chapter is a rag-bag of advanced topics such as font embedding and setting a background image.
Contents | Start | End | Previous: Chapter 22: Formatting For Print | Next: Chapter 24: Advanced Topics